Get started with your LIBERO Gx temperature (& humidity) monitoring solution with the steps below
The following steps will show you how to register, configure and connect LIBERO Gx devices. LIBERO Gx family includes LIBERO GE, GF, GF ext, GH, GL and GS.
1: Account setup and initial configurations in elproCLOUD
If you have not yet created an account, please be sure to follow these steps:
- Creating a new elproCLOUD account: How to register an elproCLOUD account
- Configuring Limit Profiles: How to manage upper and lower limit profiles
- Configuring Issue Profiles: How to manage Issue profiles
2. Configure your LIBERO Gx real-time data logger
Step 1: Add your sensor on the dashboard
-
Go to your dashboard in elproCLOUD

-
Click on Add sensor

-
Enter the unique serial number of the sensor. You can find the serial number on the module's front. Your module will be identified automatically.

☝️ Every sensor can only be set up once in one account.
Step 2: Configure Sensor basics
-
Set logging interval (by default 15 min). The logging interval determines, at which interval the sensor is logging temperature/humidity/position.
-
Set communication mode (by default Standard Mode). The communication mode determines, at which interval the measured data will be communicated to the elproCLOUD.
Communication Modes for LIBERO Gx

*Smart communication interval; Communicates depending on the environmental conditions
**Besides communication intervals, other parameters help to achieve optimal results
In the event of a temperature deviation, all LIBERO Gx loggers immediately transmit the data outside their preset communication mode to the elproCLOUD software and depend on the preset delay according to their alarm/issue profile.
- Temperature Unit: Choose between Celcis and Fahrenheit.
- Quick view access: If you use the logger for transport monitoring, you could make use of the Quick view access function. If you activate it, the last run of the logger could be read out via the QR code on the logger without a login. More information could be found in our article on Quick View Access.

-
Click Next.
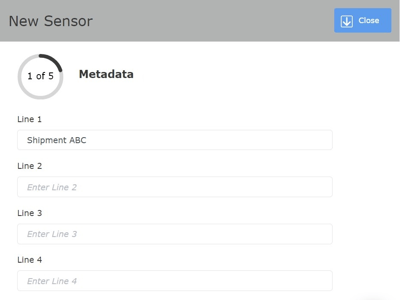
Step 3: Enter additional meta data for your sensor analysis
-
Fill in your preferred sensor name in line 1 (mandatory)
-
Free text lines 2-8 are optional: metadata may be shown on display and are included to your sensor analysis page and PDF reports

-
-
Click Next.
Step 4: Configure alarm limits
-
Click on Use Limit Profiles to activate alarm limits.
-
In the dropdown below, choose an existing limit profile. If none of the desired profiles can be found in the dropdown, you must first create a limit profile.
-
Check the upper limit(s) (H1, H2, H3, H4) and a lower limit(s) (L1, L2, L3) value in Celcius, Fahrenheit or Relative Humidity.
-
Check the Delay(s). The amount of preset logging intervals in the profile are now converted and displayed in minutes.
If you want to get immediate alarms, leave the Delay fields with 0. Please note that this setting will notify you of any deviations immediately, even if they are only a few seconds over the limits.

-
Choose how you would like to receive alarm notification (Email and/or SMS). Once you activate the notification, you will be able to choose the recipients in the dropdown list. If you would like to add new recipients, you first need to add the users to your user management.
-
Click Next.
Loggers that have an additional sensor such as a humidity sensor or an external sensor, you have to enter the alarm limits for the second sensor accordingly in a second step. The procedure is exactly the same as for the first sensor.
Step 5: Sensor issues
-
Click on Activate issue alarms to activate.
-
In the dropdown below, choose an existing issue profile. If none of the desired profiles can be found in the dropdown, you must create a new issue profile.
-
Check if all desired issue alarms are activated:
-
Missing communication warning: Notifies in case expected measurement values are not received by the elproCLOUD within the defined mode for missing communication warnings.
- Sensor failure alarm: Notifies in case the sensor is damaged and does not measure anymore.
- Lost measurement alarm: Notifies in case the system detects that a measurement is not reloaded and completely lost in the measurement history.
- Low battery warning: Notifies in case the battery of your device is low.
-
-
Choose how you would like to receive alarm notification (Email and/or SMS). Once you activate the notification, you will be able to choose the recipients in the dropdown list. If you would like to add new recipients, you first need to add the users to your user management.
-
Click Next.
Step 6: Enter additional display texts (select additional display texts)
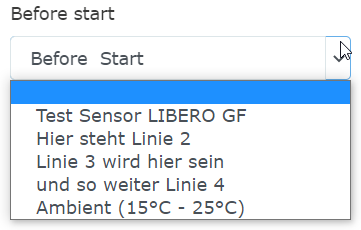
You have the possibility to show additional display texts on any LIBERO Gx device before start, in transit and after stop.
-
You can either enter any free text of your choice or use the dropdown to select certain pre-defined values, such as the temperature profile name or any metadata you entered.

-
Make sure you stay within the display limit of 16 characters:
-
-
Points are allowed after first & until before 8th character and do not count as characters
-
Double points are allowed after 2nd, 4th, 6th characters and do not count as characters
-
If more than 8 characters, a second line will show
-
If longer than 16 characters, the rest is cut off.
-
Character set: .: 0-9 A-Z +-°*%/\|(){}
-
If not in characterset, character is missed
-
LIBERO Gx only displays CAPITAL characters

-
-
Click Next.
Step 6: Select the Device Operation Mode
-
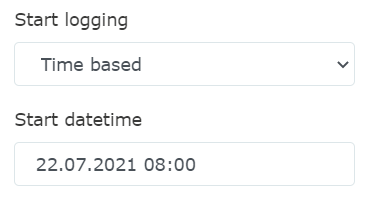
Start logging data by choosing one of the following options:
-
Start by pressing start button: You need to actively press the start button in order for LIBERO Gx to start logging temperature/humidity/position.

-
Start immediately: Once the logger is connected to elproCLOUD, it will immediately start logging temperature/humidity/position.

-
Start time-based (choose date and time): The logger will start logging temperature/humidity/position at your pre-set date & time.

-
☝️ Regardless of which startup mode you choose, LIBERO Gx always has first to connect to the elproCLOUD to obtain its configuration settings.
-
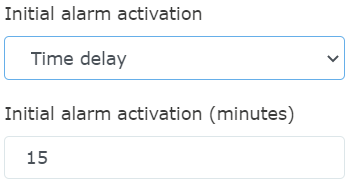
Set initial alarm activation by choosing one of the following options:
-
Immediately: as soon as logging is started, the alarm profile is activated, too. From this point on, you can receive alarm notifications about temperature/humidity deviations.

-
Time delay: The alarm delay is a multiple of the logging interval.The alarm delay is at least the duration of a logging interval.

-
-
-
Start button: as soon as you press the Start button, the alarm profile is activated, too. From this point on, you can receive alarm notifications about temperature/humidity deviations.

-
☝️ If you have set the Start Logging and your Alarm Activation settings, both by pressing the "Start Button", you have to press the Start button twice to fully activate logging & alarming.
-
Stop transit is currently always by pressing the stop button.

-
Multi-use settings (not applicable for LIBERO GS) are currently always set on "Re-configure".

-
Re-Configure means that new runs always need to be activated in elproCLOUD by setting a new configuration. Please read more here on how to start a new run and re-configure LIBERO Gx.
-
Allow new run by START button when stopped: By checking this box, a new run can be started manually, by pressing the START button on the device twice for 3 seconds each. The prerequisite for starting the device manually is that the device is in a stopped state. (Available with elproCLOUD V2.1.0 and with LIBERO Gx Firmware Version 1.1.0)

-
-
Click Next.
Step 7: Check the summary for correct configuration
- Check the summary for correct configuration ...

- ...and click apply configuration in order to send it to your device

- Follow the instructions, to connect your logger with elproCLOUD.
❌ It is not appropriate to change the configuration of the logger in transit. If the device is not started, you may change the configuration by deleting the sensor and adding it again.
❌ Please do not delete sensors in transit as they might temporarily be without network connection. We strongly recommend to wait until the device arrives and is stopped.
3. Connect your LIBERO Gx to elproCLOUD
After registration, make sure that you have defined the settings of the sensor in the elproCLOUD software and the image below is shown. Now you have 12 hours to connect your module to elproCLOUD via the following steps
- The pairing screen in the software informs you, that your Logger is now ready for configuartion..
- Press the start button for 3 seconds to initiate your device.
- When you configure the device the first time it stands on the CONFIG device. When you reconfigure the device, the device is STOPPED.
- Wait 1-2 min until sending was successful (with bad network connection it might take longer).
- As soon as the logger has connected, it follows your selected operating settings (according to step 6 on this page).
Important: The sensor has to be connected within 12 hours. If you miss the 12 hour time window, you have to delete the sensor and create it again.
If you are having trouble trying to connect your sensor, try manually bringing the configuration to the logger. If this does not work, please delete the sensor again and try again. If it still doesn't work after that, please create a support ticket.
4. Get configuration manually
If the configuration is not automatically on the LIBERO Gx Logger, you can also retrieve the configuration manually from elproCLOUD.- To get the configuration directly, press the Menu button for 3 seconds
-
Navigate through the menu by pressing the menu button shortly until "GET CONFIG"
-
Press Menu button again for 3 seconds to start transmitting and wait for display "CONF OK”
If you have problems trying to connect your sensor, please delete the sensor and try again. If it still doesn't work after that, please create a support ticket


